When a tooth fractures below the gumline, or decay spreads silently beneath the gingival margin, the issue isn’t just removing the infection anymore: there’s no visible healthy surface to seal a restoration. In these cases, clinical crown lengthening becomes the difference between placing a well-fitted crown… or losing the tooth altogether.
In the literature, it’s defined as a periodontal surgery that repositions the gum margin and, if needed, reshapes bone to expose more of the tooth without invading the biological width. But that technical definition doesn’t capture its real significance: we’re talking about preserving strong, healthy roots and avoiding extraction followed by implant placement.
Over the years in my practice, I’ve seen “doomed” teeth come back to life thanks to this procedure. And I’ve summed it up in my own words — words I’ll repeat more than once, because they’re the heart of this article:
“Clinical crown lengthening is used to expose healthy tooth structure in the coronal area so we can restore it… it’s the last resort when a tooth is seriously compromised; we need supragingival healthy tissue to place a crown, an inlay — whatever the case may be.”
With that experience as our guiding thread, we’ll explore what this technique really involves, when it’s indicated, and how it’s performed — so you’ll know if it’s truly your best option before someone suggests extracting the tooth.
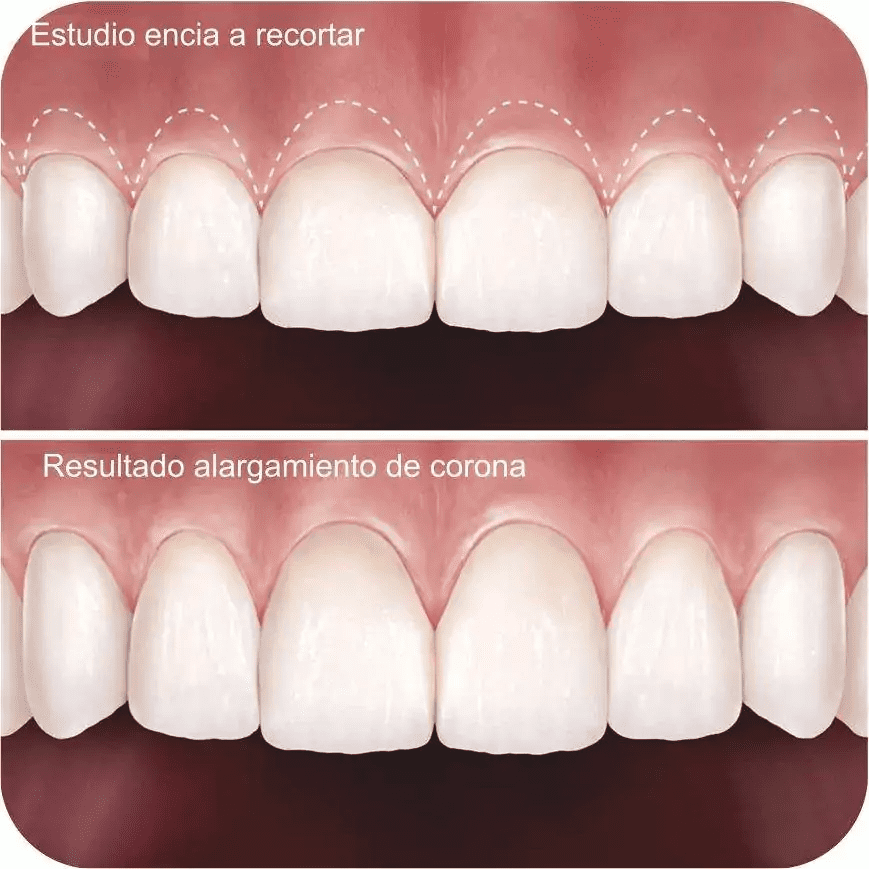
2. Clinical Crown Lengthening: What It Really Is and How I Perform It
In periodontal terms, crown lengthening is a flap surgery: I lift the gum, remove excess soft tissue, and when the root is still covered by bone, I eliminate between 1 and 3 mm of alveolar bone using high-irrigation burs. The goal is twofold: to move the gingival margin apically and preserve the biological space (≈ 3 mm) without compromising gum attachment.
My protocol includes:
- Three-dimensional diagnosis using CBCT and probing to measure the distance between the cementoenamel junction and the bone.
- Gingival design: I outline the new contour with a surgical pencil, preserving the papillae.
- Intrasulcular incision and full-thickness flap down to the mucogingival junction.
- Selective bone resection while keeping roots moist with cold saline.
- 5-0 monofilament suture and a compress with hemostatic gel.
In the vast majority of cases, I’m able to reposition the papillae intact, achieving a stable and aesthetic result. Post-op care includes anti-inflammatory medication for 48 hours, 0.12% chlorhexidine rinse for one week, and suture removal on day ten. By the two-month mark, the tissue is stable and I can take impressions for the final crown.
3. When It’s Indicated: Deep Cavities, Fractures, and Challenging Subgingival Margins
The classic indications align with what the literature describes and what I’ve consistently seen in practice:
- Subgingival or subosseous decay that invades the margin of the future restoration.
- Coronal root fractures that sit below the gumline but don’t extend into the middle third of the root. ```
- Biological width invasion caused by poorly adapted provisional restorations.
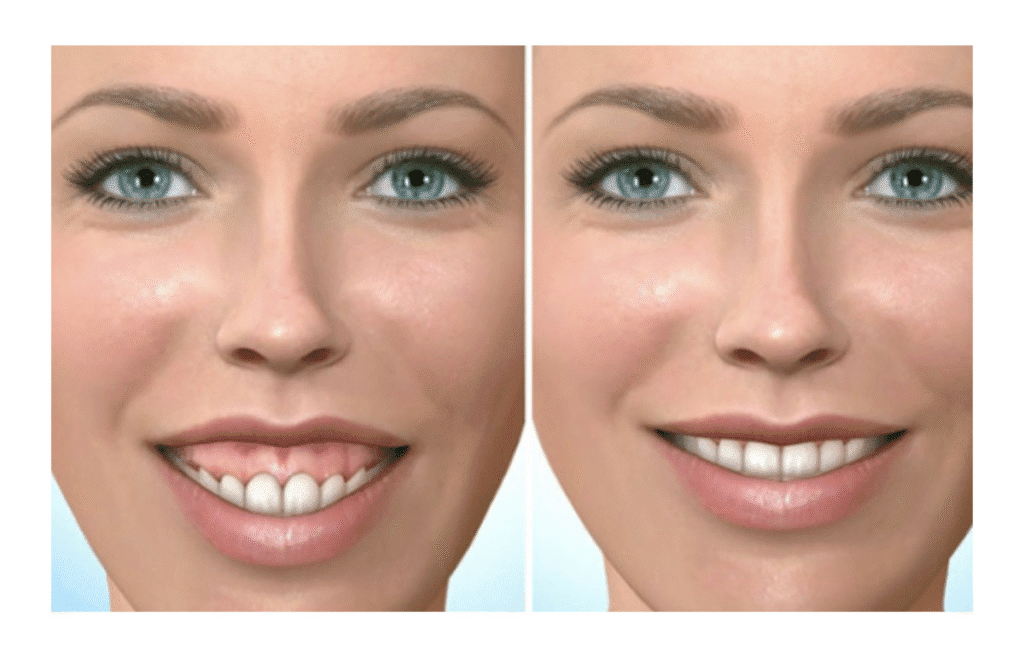
- Gummy smile (“short teeth” or gingival overbite) where part of the enamel is covered and the smile shows excessive gum display from an aesthetic standpoint.
- Preparation for onlay or overlay restorations in severely damaged molars.
In practice, I decide to intervene when the distance between the ideal finish line of the future restoration and the bone is less than 2.5 mm. That number isn’t arbitrary — histological studies show that invading that space triggers chronic inflammation and bone loss.
4. Restorative Goal: Expose Healthy, Supragingival Tooth Structure
This is where your experience fits perfectly — it sums up the purpose better than any textbook definition:
“Clinical crown lengthening is used to expose healthy tooth structure in the coronal area so we can restore it… it’s a procedure done when the tooth is already seriously compromised and the only way to restore it effectively is to gain visible, supragingival healthy tissue.”
In prosthodontic terms, exposing at least 2 mm of sound, decay-free enamel allows me to prep a fine chamfer margin and seal it with resin cement — without contamination from gingival fluids.
- Proper mechanical retention for the crown
- A finish line that’s accessible to the dentist — and to your toothbrush
- Prosthetic longevity (many crowns fail due to recurrent decay when margins are left subgingival)
The same logic applies to ceramic onlays: without exposed enamel, there’s no surface for the predictable bonding that lithium disilicate requires.
5. Concrete Benefits: Saving the Tooth and Avoiding Implants
Beyond rescuing a specific tooth, clinical crown lengthening offers tangible advantages:
- Favorable root prognosis: it preserves the periodontal ligament and natural proprioception.
- Lower biological cost compared to extraction + implant (no additional bone loss or crestal resorption).
- Preserved esthetics: the reshaped gum follows your natural biotype and avoids the typical recession around metal abutments.
- Immediate function: in many cases, I place a provisional crown 1 mm above the margin just 48 hours after surgery, so you maintain esthetics during healing.
- Psychological: never underestimate the difference between “saving my tooth” and “replacing it with something artificial” when it comes to treatment acceptance.
Clinical evidence reports survival rates of over 10 years for crowns placed on lengthened teeth, as long as the biological space is respected and a high-strength material is used.
6. Surgical Step-by-Step: From Anesthesia to Sutures
Preparation and Anesthesia
I place an inverted rubber dam to isolate the damaged crown, administer 1:100,000 articaine infiltration anesthesia, and have the patient rinse with 0.2% chlorhexidine.
Incision and Flap
I make an intrasulcular incision around the affected tooth and its two neighboring teeth, then raise a full-thickness flap to expose the alveolar bone.
This provides full visibility of the enamel-to-bone relationship.
Selective Osteotomy
Using a round carbide bur and an acrylic surgical guide, I remove bone until there’s 3 mm of space from the planned restoration margin.
I irrigate with chilled saline to minimize thermal necrosis.
Osteoplasty
I smooth the buccal and lingual bone plates to eliminate sharp angles that could trap plaque.
Periodontal Probe Check
Before suturing, I confirm: 3 mm of hard tissue clearance + 1 mm of soft tissue = 4 mm to the projected gingival margin.
Sutures and Dressing
I use 5-0 monofilament with simple stitches and apply a periodontal dressing if the tissue biotype is thin.
Postoperative Follow-Up
At 24 hours, I check for bleeding; at one week, I remove sutures; at 6 weeks, I perform a verification probing.
By weeks 8–10, I take final impressions.
The entire process keeps the focus on ensuring that your restoration is anchored on healthy tissue exposed by the surgery.
7. Risks, Contraindications, and Post-Operative Care
Risks
- Root sensitivity in the first weeks: managed with arginine-based toothpaste.
- Prolonged bleeding if there's an undiagnosed clotting disorder.
- Gingival relapse when the flap is sutured too coronally or in thick biotypes.
- Excessive recession in aesthetic zones with thin biotypes.
Contraindications
- Previous bone loss that compromises the crown-to-root ratio.
- Patients with poor oral hygiene (risk of superinfection).
- Heavy smoking: triples the likelihood of recession.
- Active periodontal disease: must be stabilized first.
Care
- Apply ice locally: 15 minutes × 3 sessions in the first few hours.
- Ibuprofen 600 mg every 8 hours for the first 48 hours.
- Soft, lukewarm diet for two days.
- Gentle brushing with a surgical toothbrush starting on day three.
- Avoid rinsing with hydrogen peroxide or alcohol-based chlorhexidine until sutures are removed.
Following these steps reduces complications and ensures the promised restorative benefit is achieved.
8. Frequently Asked Questions: Pain, Healing, and Cost
Does the procedure hurt?
You won’t feel anything during the surgery; post-op discomfort is usually mild and manageable with anti-inflammatories.
How long does it take to heal?
The epithelium closes in 7–10 days; bone remodeling finishes around 6 weeks; full gingival stability sets in at 8–10 weeks — the ideal time to take the final impression.
Can the gum grow back down?
If the biological width is respected and your hygiene is good, relapse is < 10% over five years.
What about sensitivity?
It goes away once the final restoration is placed; in the meantime, I use fluoride varnish and potassium nitrate toothpaste.
Is it expensive compared to an implant?
In my practice, crown lengthening + crown costs about 60%–70% of what extraction, grafting, implant placement, and crown on implant would cost.
And you keep your periodontal ligament — something titanium can’t replicate.
9. Conclusions – Saving Teeth with Healthy Margins and a Solid Prognosis
Clinical crown lengthening is a surgery with a clearly conservative intent: repositioning the gum — and when needed, the bone — to create the conditions where a restoration can be sealed onto clean, hard tissue. My personal experience, which I share word for word, sums it up better than any textbook:
“We need supragingival healthy tissue to restore effectively — crown, inlay, whatever it may be.”
When a tooth is seriously compromised, this procedure becomes the last and best chance to keep it in the mouth with a long-term prognosis. The literature supports its success — as long as biological width is respected and the patient is consistent with hygiene and follow-up. But more importantly, thousands of crowns placed after successful lengthenings prove that this surgery isn’t about aesthetics — it’s the functional foundation for a lasting restoration.
If your dentist suggests extraction right away, ask if your case could be a candidate for this procedure first; a modest shift in gum and bone may be all it takes to save your natural tooth with complete reliability.
If you’re thinking about straightening your smile discreetly, book an appointment and let’s clear up your questions face-to-face. At AM Dental Studio, Zapopan, we review your case, talk honestly about costs, timelines, and care, and map out a realistic plan for your lifestyle.
Best Choice
📍 Zapopan, Guadalajara
🌐 amdentalstudiogdl.mx